Showing posts with label Partition. Show all posts

Increase Your Internal Memory from Link2sd


Link2SD is an android application by Bulent Akpinar that lets you move apps and games to the 2nd partition of your SD card. Why do we have to use Link2SD when Froyo and Gingerbread’s Native Apps2sd moves the files to the SD card? Native apps2sd only moves the apk file of the application leaving other files in internal memory thus you still have to manage your on-board memory and limit your choice of apps because it will eat up your memory and later on you cannot install any files anymore. Additionally, widgets and some applications are not intended to be moved to the SD card. However, Link2SD is only for root users because it is required that your phone is rooted.
Link2SD
The idea behind the application is the same. But Link2SD has more relevant features which the Native Apps2sd lacked giving Android 1.5 and up users the chance to have a taste of what it’s like to have a big phone memory. Additional features were added by the developer to furher optimize the usage of android devices. By using Link2SD, you can move not only the application file, but also  the dalvic-cache and libray files of the application. This means that data will be the only one left to consume your internal memory thus installing applications and games would be easier because you can install anything you want without worrying about the famous low memory problem. Furthermore, Link2sd covers all files even moving widgets and the unmoveable applications to the 2nd partition of your SD card.
This is a step by step guide on how you can run Link2SD on your device. This tutorial will work for both stock and cutom ROMs. For ClockWorkMod Recovery users, you can check the other guide below. Follow all the instructions carefully to eliminate possible problems.
  1. First you have to download Mini Tool Partition Wizard Manager. You can download it HERE.
  2. Insert your SD card to a card reader and open it on your computer.
  3. Back up all your files to the computer because partitioning will wipe your data.
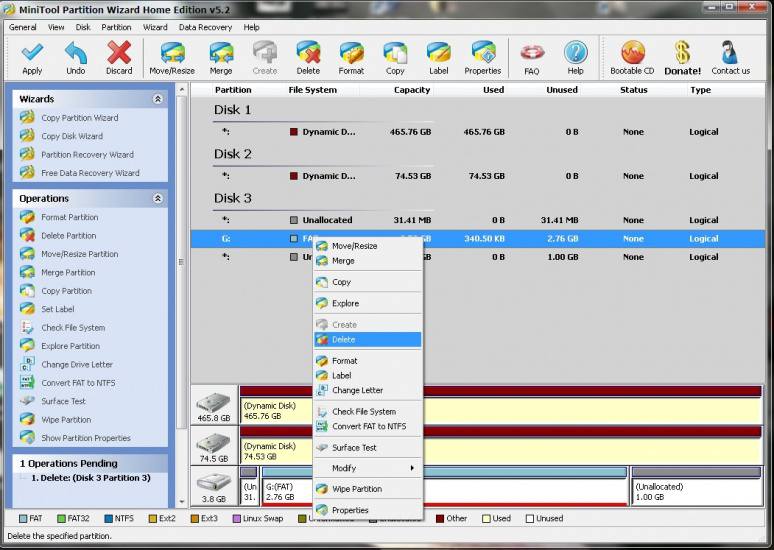
  4. Open Mini Tool in your computer. Locate your SD card (be careful in choosing and make sure not to choose the drive of your computer)
  5. Right click and choose Delete.link2sd 3
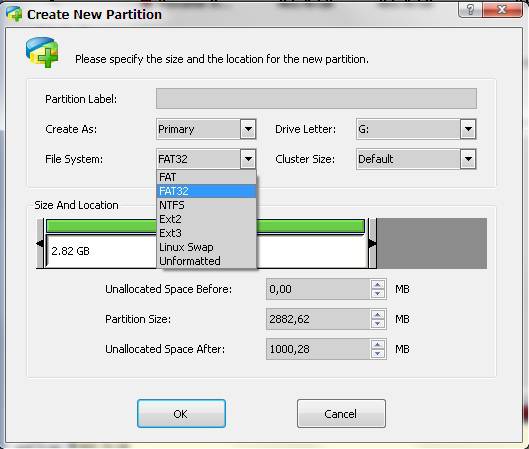
  6. Right click on it again and choose Create New. Create “FAT32″ partition (This is where all your media files will go. Be sure to make it bigger than the 2nd part)
  7. Select “Create as: PRIMARY” link2sd 4
  8. Next, create an ext2/ext3/ext4 partition (if you’re on stock ROM, choose ext2). This is where your apps will go. I suggest a value of 512Mb or 1Gb would be big enough but if you insist you can go as high as 2Gb.
  9. Select “Create As: PRIMARY” (make sure that it is both set to primary because it will not work if it is not set to primary) link2sd 5
  10. Click the “Apply” button on the top left corner and wait for it to finish the process. Done.
  11. Put back your SD card to your phone and switch it on.
  12. Download and install Link2sd from Google Play Store.
  13. Open Link2sd. You will be prompted to choose between ext2, ext3, ext4 and FAT32. Select ext2. link2sd 6
  14. It will say mount script created. Reboot your phone now.
  15. Open link2sd and if the message doesn’t show up, you succeded.
  16. Go to Link2sd>Settings>check the autolink (to automatically move apps upon installation)
  17. If you already have some apps, select “move to phone” then after moving select “Create Link” (be sure to check the three files: app, dalvic-cache and library files)
  18. link2sd 2link2sd
  19. To check your memory, select “Storage Info”. This will show you the current state of your internal memory, FAT32, and ext2 partition.                                                                                            link2sd 7
  20. Now you’re done and ready to install vast amount of applications as you wish!
FOR CLOCKWORKMOD RECOVERY USERS ONLY( ALTERNATIVE METHOD)
NOTE: You can also use the instructions above. This guide will work on both stock and custom ROMs.
  1. Back up all your files to your computer. Partitioning wipes the files of your SD card.
  2. Go into recovery mode
  3. Select “Advanced”
  4. Select “Partition SD card”
  5. Choose your SD-ext size (if you’re using a 2Gb SD card, choose 512Mb. If your SD card is 4Gb or greater, you can choose 1024Mb)
  6. Select 0 swap
  7. Wait for the process to finish. Reboot.
  8. Download and install Link2SD from Google Play Store.
  9. Open Link2SD you will be prompted to choose between ext2, ext3, ext4 or FAT32. Choose ext4.
  10. Follow instructions number 14-20. DONE!
Having troubles? Feel free to comment and post your questions below. Enjoy! :)

Solution - Fix Low Disk Space Warning


This article tells you how to increase disk space without buying a new one when having low disk space warning on your computer.
The trouble:
  • There is less and less free space on hard disk especially c drive and constantly receiving message reporting "low disk space"
  • Low disk space notification in my Windows 2003 SBS telling my server is running low on disk space
  • You are running out of disk space on Win2K3 c: drive
There are more similar problems related with disk low space and the above are just samples for those who have such problem. The very sign or error that most of us can see on our computer or server is as followed:
low disk spacespace low

Solution:

To remove the low disk space warning, there are many efficient ways.
Most recommended method - Increase the partition space by allocating more space to your disk. If your c is running out of space, you can add free space from other partitions and allocate it to c drive. See tutorial:How to allocate space to c drive . If any other partition is too small, you may see tutorial: how to resize partition
  1. Resize partition with some partition software by extending (most efficient) to make c drive larger (Recommended) - Problem can be fixed
  2. Clean dump files, remove temp files in your system as Windows tells us to delete old or unnessary files and this will be directed by Windows when you click the low disk space warning message - Only save 1GB at most space
  3. Reinstall your system and enitialize your hard disk and then arrange more space to system partition - Too much work and complicated job
  4. Remove the low disk space warning in your system - Problem still there
When we say "problem", here it refers to "low disk space". The first tip is highly recommended since it won't touch your system nor your other data. The second tip won't save you much space to the c partition. Usually by clearing the dump files, it only can save as to 1MB to 1GB at most. The third one is not recommended since you need to backup all your data and move them to another disk or PC and then reinstall the system. The third one is a tough and not easy job to perform. You might lose your data or harm other files while doing this when backup or moving files failed. The fourth one is easy but needs special guide, which is not a non geek job, and besides it won't solve the problem of low disk space but only making the warning not show up any more.

Expand C Drive with Free Space

To make the disk space alert disappear, you may expand the system c drive large enough like 10GB, 150GB if you have other free space on the disk and the alert won't trouble you again. This is easy, data protected and the best way to maxmium system performance. See a tutorial that shows how to extend drive on a server machine.
  1. Download a free trial and run it.
  2. Right click the partition which you want to change size, and go to "Resize/Move" on the show-up menu. ( launch Partition Wizard Server. Right click the partition which is with a lot of free space and shrink the partition to make unallocated space on the disk. And go to “Resize/Move” to make this big partition smaller. Why? Unallocated space is needed to enlarge partitions. )
  3. resize partition
  4. Drag the partition rightwards to shrink partition and make some space available for redistribution (with unallocated space on the disk, you can right click the partition which you want to enlarge such as C drive and also go to “Resize/Move” option. And then claim the unallocated space by enlarging c drive. Position the mouse pointer on the left or right partition handle and drag the handle to enlarge the partition size you want. If the unallocated space is not just next to c drive, you need to move the partition which is in between also by right clicking the partition and go to “Resize/Move”. )
  5. shrink partition----> free space available
  6. Right click the system partition and choose Resize/Move. In the pop up window, drag the right borderline of the system partition to extend.
  7. extend c drive ---->c drive larger
lick “Apply” on the toolbar to have a enlarged c drive. Note: only on full version can “Apply” work. Be free to register Partition Wizard Server to have a larger partition and also keep your system and other data untouched.

Capture Unallocated Partition Space in Windows 7


How to Capture Unallocated Partition Space in Windows 7

unallocated space to resize
  • To begin, right-click on the Windows 7 partition and select the Move/Resize command, as shown in the following picture.
resize move partition option
  • Select the Move/Resize command on the Windows 7 partition.
As soon as you do, you’ll see the Move/Resize Partition dialog box, where you can resize the partition either by typing the appropriate numbers in the text boxes or by simply selecting the marker at the beginning of the partition and dragging it all the way to the left.
claim the unallocated space
  • You can resize the partition by dragging the marker all the way to the left.
  • Once you drag the marker all the way to the left, you’ll see that the partition now occupies the full hard disk, as shown in Figure D. To continue, click OK, and you’ll return to the main Partition Wizard window.
drag the partition toclaim the unallocated
  • The partition is now staged to occupy the full hard disk.
  • To initiate the Move/Resize Partition, you can click the Apply button below the Operations Pending panel, as shown in Figure E.
operations to apply
  • Click the Apply button below the Operations Pending panel to initiate the Move/Resize Partition operation.
  • When you do, Partition Wizard will recognize that the partition that you are resizing is the current partition and will display an error message that will also prompt you to restart the system, as shown in Figure F.
reboot the system
Partition Wizard will prompt you to restart the system so that it can perform the Move/Resize Partition operation.

Gmail Drive guide to use Gmail space as online storage drive hack


Free Gmail drive help to use gmail space as external drive
Gmail is really famous among users of all the email clients available on the web and that is not because it has a cool interface rather it is famous for its reliability and huge space which includes storage space of 6000 megabytes  and increasing. Google doesn’t stop here and recently Google announced that users can now buy more online storage for Google services just by paying a little amount. So why not use this online storage space and use it externally probably as a network drive or one of your own computer hard drives.
Use Google Storage Space as Google Drive
I am going to show different methods by which your can use your Gmail account space as your external hard drive that too free. You will be able to download (or should I say copy) attachments from your Gmail account to your computer just as you would do from a drive on your computer. You can also use this space to upload content direct from your computer and save it online in your Gmail account.
1. GMAIL DRIVE
Gmail Drive Guide free
GMail Drive is a Shell Namespace Extension that creates a virtual filesystem around your Google Mail account, allowing you to use Gmail as a storage medium.
GMail Drive creates a virtual filesystem on top of your Google Gmail account and enables you to save and retrieve files stored on your Gmail account directly from inside Windows Explorer. GMail Drive literally adds a new drive to your computer under the My Computer folder, where you can create new folders, copy and drag’n'drop files to.
With GMail Drive you can easily copy files to your Google Mail Account and retrieve them again.
When you create a new file using GMail Drive, it generates an e-mail and posts it to your account. The e-mail appears in your normal Inbox folder, and the file is attached as an e-mail attachment. GMail Drive periodically checks your mail account (using the Gmail search function) to see if new files have arrived and to rebuild the directory structures. But basically GMail Drive acts as any other hard-drive installed on your computer.
You can copy files to and from the GMail Drive folder simply by using drag’n'drop like you’re used to with the normal Explorer folders.
Because the Gmail files will clutter up your Inbox folder, you may wish to create a filter in Gmail to automatically move the files (prefixed with the GMAILFS letters in the subject) to your archived mail folder.
Please note that GMail Drive is still an experimental tool. There’s still a number of limitations of the file-system (such as total filename size must be less than 65 characters). Since the tool hooks up with the free Gmail Service provided by Google, changes in the Gmail system may break the tool’s ability to function. I cannot guarantee that files stored in this manner will be accessible in the future.
2. PHP GMAIL DRIVE (PGD)
free guide for php gmail drive pgdPhp Gmail Drive is a new type of file sharing utility. Unlike typical file servers (say xDrive) it uses Gmail as backend file server. You can enjoy it simply by hosting a small PHP script in your web site without any database. Gmail file space is more than 2GB, so you can imagine you already have such a big space on internet. However, you will require a Gmail account (If you don’t have any Gmail address, go GmailSwap or ask your friends.). PGD automatically connects Gmail server and fetches list of all attached files and generate downloadable links in a tree like view. If you are looking for a file server to upload your music or notes without any hassle, PGD is ideal for you. Technically speaking PGD is wrapper of Gmailer . Thought there is  no need to know hecks of PHP or Gmailer.  Just you have to check that your PHP hosting service provider has curl extension of PHP to handle HTTP/HTTPS traffic.
Features
* Successfully connects to Gmail and only grabs list of Attachments in Gmail messages.
* List of attachments are displayed with inbuilt Javascript engine. You can customize output to any other formats.
* 100% compliant to GMAILFS. So you can upload with Windows Gmail Shell extension or Linux GmailFS utilities..
* Supports Multiple Gmail accounts in the same script .
* Supports all browsers.
* Total size is less than 100 KB.
3. GSPACE
Free Gspace Guide to use gmail as drive
Gspace is the FON friendly site that provides FREE Online Storage to access your files everywhere.
Gspace turns the 2GB of your Gmail account into free online storage. With Gspace you can manage unlimited Gmail accounts to store all type of files within its simple, user friendly interface.
Listen your favourite stored music directly from your Gspace, view your collections of pictures and manage your Gdrive files as well.
Gspace works with Windows Os, Linux, and MAS OSX

Create Network Ghost Bootup Disks


Create Ghost Bootup with Network

This trick shows you how create Symantec Ghost bootup floppy disks with Network option. With the network option, you can access the network resources and use the GhostCast feature to perform backup/restore via the network. The instructions based on Ghost 8, but similar procedures can be done on different versions of Ghost.
If you're looking for the instructions how to create a standard Symantec Ghost Bootup (i.e. without Network), click Here instead.
Or if you're looking for the instructions how to create a Ghost Bootup CD from the two floppy disks, click Here instead.
Use this trick at your own risk.

Here's how

  1. Open the "Symantec Ghost Boot Wizard".
  2. Select "Network Boot Disk" and click "Next".
  3. At the screen "Symantec Ghost Boot Wizard - Network Interface Card", select an appropriate driver for your network card. If you need more details on a driver, click on it and select "Modify".
    If you don't see your network card listed, follow the next step to add a new one; otherwise, select your network card and click "Next" (and skip to step 9).


  4. To add a new driver, search and download your driver from the internet. Make sure you download a "DOS" driver. A "Packet Driver" usually comes with a ".COM" file or ".EXE" file. A "NDIS2 driver" usually comes with a ".DOS" file.
  5. Click "Add" on the screen "Symantec Ghost Boot Wizard - Network Interface Card" to bring up the "Template Type" dialog.

    Select "NDIS2 driver" or "Packet Driver" depending on what you have. (You probably have more luck searching a "NDIS2 driver" - file with ".DOS") then click "OK".
  6. At the screen "Template Properties", click on the "Browse..." button and browse to your driver. Then enter a name for "Driver Name". A driver name should be very simple and must end with a "$". For example, you can take the first few letter of your driver file and add the "$":
  7. Click "OK" to go back to the screen "Symantec Ghost Boot Wizard - Network Interface Card"
  8. The "Name" field of the new driver should be editable. Go ahead to change this name the way you want. This name is just to help you recognize it from the list. Then click "Next".
  9. Click "Next" on the next screen to "Use PC-DOS".
  10. On the next screen, you'll need to specify where the file "ghost.exe" is located. This file is normally installed to a path as example below, but you should double check. Then click "Next".
  11. Click "Next" on the next screen to use default options for external storage devices.
  12. On the next screen, you'll need to specify the Tcp/ip options. The Tcp/ip can be either "Automatic IP" (or "DHCP"), or "Static IP".
    If you plan to run Ghost on multiples computer on a same network at a same time (using GhostCast), you should specify a static IP for each CD to avoid conflicting. Otherwise, you can always select "DHCP will assign the IP settings". Then click "Next".


  13. Click "Next" on the next screen:
  14. Click "Next" on the Review screen:
  15. A message will display telling you that you will need two floppy disks. Click "OK".
  16. The Boot Disk Wizard will start to erase your floppy and create the boot data. Once it's done with the first disk, it will prompt for a second one.